Plastic SCM and Mantis II
As seen on the previous post, Plastic SCM and Mantis I, in order to use this extension, the first thing you will have to do is copy the ‘mantisextension.dll’’ library to Plastic SCM client fo,lder, and add the Mantis extension lines on the client.conf.
And then, for the working mode we are explaining on this post: "task on changeset", the following "mantisextension.conf" file must be created:
Now that the extension is set up you can start working with it!
Depending on your company´s structure, either the project manager or a developer would be in charge of creating Mantis tasks and then assign them to the developer who would work to solve them.
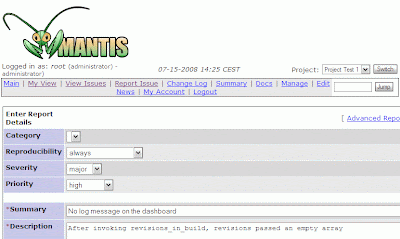
On this example we create two new tasks: task number 4 as shown on the image below, and also task 5.
Once the tasks have been created and assigned, the developer starts working, he makes his changes after checking out the items he is going to work on (either from Plastic GUI or from one of its IDE plug ins), and when the changes are done and he checkes his code in Plastic will open a window on which the user can include in the “checkin information”, it has the following appearance:
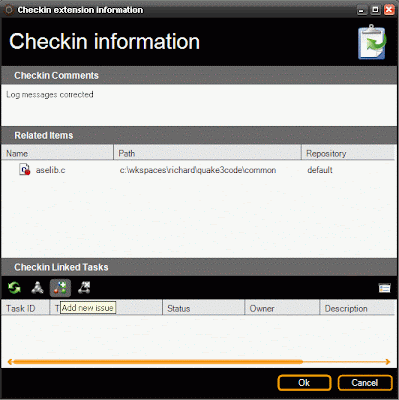
As you can see, on the top of this window the user can include his check in comments and the list of related items is shown.
The checked in tasks are included at the buttom, by selecting the option "Add new issue" the following window will appear:
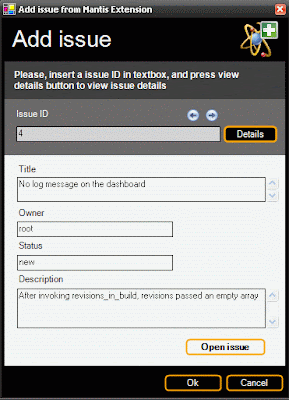
Just by entering the task number as we include number 4 for the newly created task, the information of the Mantis issue will be shown.
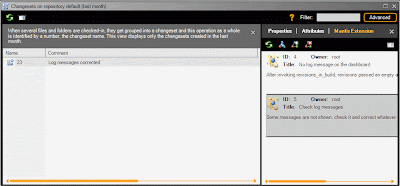
Once the check in operation is done we can go to the changeset view and just by clicking on the changeset view and selected a changeset, we can see the Mantis Extension information on the right, in this case, by selecting the created changeset, 23, we can see on the extension information about its associated task, number 4; but that is not all...as using the "task on changeset" mode, one or more than one tasks can be related with one or more changeset, from this view we can also add new tasks to the changeset.
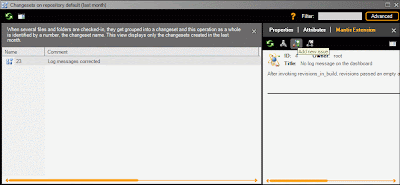
Now we have associated two tasks with changeset 23 as both of them have been solved on the same check in operation, by clicking on one of the tasks shown on the extension information we can either delete it necessary, or open the task on the Mantis IDE, from which information such as the status of the task can be modified and it will be inmediately reflected on Plastic information of the extension as soon as it is refreshed!
And then, for the working mode we are explaining on this post: "task on changeset", the following "mantisextension.conf" file must be created:
<MantisExtensionConfiguration>

 <MantisBaseUrl>http://localhost:8888</MantisBaseUrl>

 <Branchprefix>SCM</Branchprefix>

 <workingmode>TaskOnChangeset</workingmode>

</MantisExtensionConfiguration>
Now that the extension is set up you can start working with it!
Depending on your company´s structure, either the project manager or a developer would be in charge of creating Mantis tasks and then assign them to the developer who would work to solve them.
On this example we create two new tasks: task number 4 as shown on the image below, and also task 5.

Once the tasks have been created and assigned, the developer starts working, he makes his changes after checking out the items he is going to work on (either from Plastic GUI or from one of its IDE plug ins), and when the changes are done and he checkes his code in Plastic will open a window on which the user can include in the “checkin information”, it has the following appearance:

As you can see, on the top of this window the user can include his check in comments and the list of related items is shown.
The checked in tasks are included at the buttom, by selecting the option "Add new issue" the following window will appear:

Just by entering the task number as we include number 4 for the newly created task, the information of the Mantis issue will be shown.
Once the check in operation is done we can go to the changeset view and just by clicking on the changeset view and selected a changeset, we can see the Mantis Extension information on the right, in this case, by selecting the created changeset, 23, we can see on the extension information about its associated task, number 4; but that is not all...as using the "task on changeset" mode, one or more than one tasks can be related with one or more changeset, from this view we can also add new tasks to the changeset.

Now we have associated two tasks with changeset 23 as both of them have been solved on the same check in operation, by clicking on one of the tasks shown on the extension information we can either delete it necessary, or open the task on the Mantis IDE, from which information such as the status of the task can be modified and it will be inmediately reflected on Plastic information of the extension as soon as it is refreshed!


0 comentarios: