Sideloading scenarios for Windows Store Apps
Sideloading is the mechanism to install Windows Store apps without downloading from the Windows Store. This would occur if we want to distribute line of business (LOB) apps or for testing purposes.
For many Windows Store apps, the publishing flow is usually pretty basic and as easy as following this wizard:
Using this wizard, we can generate our app packages, and upload them to the Windows Store in an easy way. But sometimes we face more complex scenarios beyond the scope of Visual Studio. Sometimes we don't want to publish our app but need a way to distribute it in our organization.
Some common scenarios that could cause this situation are:
- Generating app packages within a Continuous Integration flow.
- Automating a Sideloading scenario to distribute the app outside the Windows Store.
- Installing on the same machine different versions of the app for different environments (Development, Release Candidate, Production, etc.)
This article will explain the mechanisms that will allow us to cover these three scenarios.
Prerequisites
MSBuild
If we talk about compiling .Net apps from the command line, we should talk about MSBuild. For the examples in this article we will assume that we have added the path to MSBuild to the PATH environment variable.
We can use the Windows registry to locate the path depending on the version of MSBuild we want to use. To find out the location of the version 14 (Visual Studio 2015) we could execute this command:
reg.exe query "HKLM\SOFTWARE\Microsoft\MSBuild\ToolsVersions\14.0" /v MSBuildToolsPath
Version control
We assume that the source code of the project has already been download from our SCM. To perform this step, we can use the command line or any of the integrations available:
Sample project
To show the different scenarios, we will use a project created from the Grid App template in Visual Studio 2015. The only change made to this project has been to set the package name CodiceSoftware.SideloadingSample in the Package.appxmanifest file.
Generating app packages within a Continuous Integration flow
Regardless of the software we use to run our continuous integration flow, we should:
- Download source code from our SCM (done).
- Compile the project and generate the app package (Appx).
- Put the app package in a shared folder that will be accessible to other team members (QA as an example).
Compiling the project
To create the app package, we could do this:
C:\SideloadingSample> msbuild
If we run the msbuild command in the same folder where our solution is located, it will automatically compile and create the package in the AppPackages folder. Inside the AppPackages folder we will find one file with the extension .appxupload and one folder with name SideloadingSample_1.0.0.0_AnyCPU_Debug_Test.
The file is only needed if we want to upload our app to the Windows Store. In this scenario we need the folder SideloadingSample_1.0.0.0_AnyCPU_Debug_Test that will contain something like this:
The good news is that the msbuild command performs steps 2 and 3 automatically. The bad news is that sometimes, in some solutions, it does not generate the package. If this happens to you, you can solve it by running msbuild with this parameter:
C:\SideloadingSample> msbuild /p:GenerateAppxPackageOnBuild=true
Put app package in a shared folder
We could easily copy the package into a shared folder but msbuild has another parameter that will do the work for us. For example, if we want to generate the package into the folder C:\AppxSample\, we only need to do this:
C:\SideloadingSample> msbuild /p:AppxPackageTestDir="C:\AppxSample\"
This parameter will not copy the .appxupload file. If we want this file to be copied, there is another parameter for this purpose:
C:\SideloadingSample> msbuild /p:AppxPackageDir="C:\AppxSample\"
At this point, we can run the script Add-AppDevPackage.ps1 to install the app:
Automating a Sideloading scenario
The scenario we have seen so far is intended for a testing environment. In this case, we could install the application package executing the script Add-AppDevPackage.ps1. But as Microsoft advises, this mechanism is temporary and is only meant to be used for testing purposes.
To prepare a Sideloading scenario, we must do some additional steps in the process of generating the app package. Although we could approach it in many ways, a simple method would be:
- Autoincrement app version number
- Compile app in release mode
- Sideload the app using any of the available methods
Autoincrement app version number
By default, the app package is created with version 1.0.0.0. This version number is stored in the file Package.appxmanifest and looks like this:
<?xml version="1.0" encoding="utf-8"?>
<Package xmlns="http://schemas.microsoft.com/appx/2010/manifest" xmlns:m2="http://schemas.microsoft.com/appx/2013/manifest">
  <Identity Name="CodiceSoftware.SideloadingSample" Publisher="CN=CodiceSoftware" Version="1.0.0.0" />
  ...
</Package>
What we need to do is to modify the version number before compilation. We could do this easily with this script:
Function Get-AutomaticPackageVersion() {
    $currentDate = Get-Date
    $mayor = $currentDate.Year
    $minor = $currentDate.ToString("Mdd")
    $build = $currentDate.Hour * 60 + $currentDate.Minute
    $revision = $currentDate.Second
    return ("{0}.{1}.{2}.{3}" -f $mayor, $minor, $build, $revision)
}

Function Set-AppxManifestVersion($file, $version) {
    $xml = [xml](Get-Content $file)
    $node = $xml.Package.Identity
    $node.Version = Get-AutomaticPackageVersion $args[1]
    $xml.Save($file)
}

$version = Get-AutomaticPackageVersion
$manifestFile = Join-Path (pwd).Path 'SideloadingSample\Package.appxmanifest'
Set-AppxManifestVersion $manifestFile $version
This script generates version numbers with this format:
{Year}.{Month&Day}.{MinuteOfTheDay}.{Second}
Compile app in release mode
This step y very easy. We only need to tell msbuild what build profile to use:
C:\SideloadingSample> msbuild /p:Configuration="Release" /p:AppxPackageTestDir="C:\AppxSample\"
Sideload the app using any of the available methods
We have several mechanisms to Sideload Windows Apps:
- System Center 2012 Configuration Manager
- Windows Intune
- Microsoft Deployment Toolkit
- Vanilla PowerShell
In this case, we will describe the mechanism using Vanilla PowerShell and it is important to remember that we should not use the testing script Add-AppDevPackage.ps1. Here are some techniques that will make it easier to do this task.
Generate fixed package name
We can give a fixed name to the package files in order to simplify the scripting tasks. For example:
C:\SideloadingSample> msbuild /p:Configuration="Release" /p:AppxPackageTestDir="C:\AppxSample\" /p:AppxPackageName="SideloadingSample-Latest"
This way, the app package file will always be SideloadingSample-Latest.appx. This parameter affects only the file name. The other package information is still obtained from the manifest file.
Install/Verify/Uninstall Appx package
To install any Appx package, PowerShell provide us with the command Add-AppxPackage:
PS C:\AppxSample> Add-AppxPackage .\SideloadingSample.appx
We can verify if the app is installed with the Get-AppxPackage command:
PS C:\AppxSample> Get-AppxPackage -Name CodiceSoftware.SideloadingSample

Name              : CodiceSoftware.SideloadingSample
Publisher         : CN=CodiceSoftware
Architecture      : Neutral
ResourceId        :
Version           : 2016.404.753.14
PackageFullName   : CodiceSoftware.SideloadingSample_2016.404.753.14_neutral__25zdm1byp7tsp
InstallLocation   : C:\Program Files\WindowsApps\CodiceSoftware.SideloadingSample_2016.404.753.14_neutral__25zdm1byp7tsp
IsFramework       : False
PackageFamilyName : CodiceSoftware.SideloadingSample_25zdm1byp7tsp
PublisherId       : 25zdm1byp7tsp
IsResourcePackage : False
IsBundle          : False
IsDevelopmentMode : False
If we want to remove a recently installed app, we can do it easily:
PS C:\AppxSample> Get-AppxPackage -Name CodiceSoftware.SideloadingSample | Remove-AppxPackage
This technique is interesting because allow us to delete multiple packages at once. For example, if we want to remove all packages from CodiceSoftware, we could do it with the following command:
PS C:\AppxSample> Get-AppxPackage -Name CodiceSoftware* | Remove-AppxPackage
Installing on the same machine different versions of the app for different environments
To install different versions of the same application, we must go a step further by editing the file Package.appxmanifest. To do this we must change the Name attribute in the Identity node.
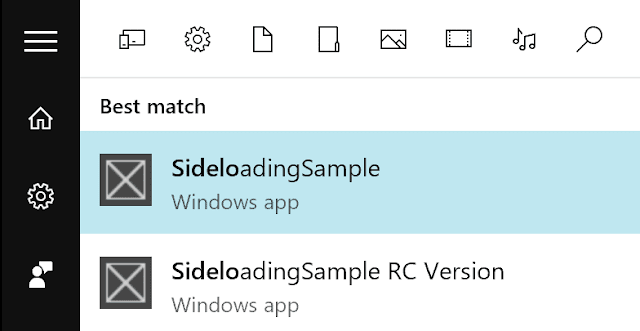
With this change we could install multiple versions of the same app, but would face a problem with identify them:
To distinguish both apps, we must also modify the DisplayName node. We could do with this script:
Function Set-AppxManifestName($file, $identityName, $displayName) {
    $xml = [xml](Get-Content $file)
    $identityNode = $xml.Package.Identity
    $identityNode.Name = $identityName
    $propertiesNode = $xml.Package.Properties
    $propertiesNode.DisplayName = $displayName
    $visualElementsNode = $xml.Package.Applications.Application.VisualElements
    $visualElementsNode.DisplayName = $displayName
    $xml.Save($file)
}
After doing this, we could easily distinguish each version of the app:
Of course, we could improve this mechanism event by changing app icons, description, etc.
Full script
To summarize, this is the complete script that shows everything explained in this post:
Function Get-AutomaticPackageVersion() {
    $currentDate = Get-Date
    $mayor = $currentDate.Year
    $minor = $currentDate.ToString("Mdd")
    $build = $currentDate.Hour * 60 + $currentDate.Minute
    $revision = $currentDate.Second
    return ("{0}.{1}.{2}.{3}" -f $mayor, $minor, $build, $revision)
}

Function Set-AppxManifestVersion($file, $version) {
    $xml = [xml](Get-Content $file)
    $node = $xml.Package.Identity
    $node.Version = Get-AutomaticPackageVersion $args[1]
    $xml.Save($file)
}

Function Set-AppxManifestName($file, $identityName, $displayName) {
    $xml = [xml](Get-Content $file)
    $identityNode = $xml.Package.Identity
    $identityNode.Name = $identityName
    $propertiesNode = $xml.Package.Properties
    $propertiesNode.DisplayName = $displayName
    $visualElementsNode = $xml.Package.Applications.Application.VisualElements
    $visualElementsNode.DisplayName = $displayName
    $xml.Save($file)
}

$version = Get-AutomaticPackageVersion
$manifestFile = Join-Path (pwd).Path 'SideloadingSample\Package.appxmanifest'

Set-AppxManifestName $manifestFile "CodiceSoftware.SideloadingSampleRC" "SideloadingSample RC Version"
Set-AppxManifestVersion $manifestFile $version

msbuild /t:Rebuild /p:Configuration="Release" /p:AppxPackageTestDir="C:\AppxSample\" /p:AppxPackageName="SideloadingSample"
Conclusions
Conclusions Integrating Store Apps in a complex deployment or testing flows is relatively simple once you know what to do. Unfortunately, this kind of flows occurs so infrequently that Microsoft does not pay much attention to it and the documentation about it is quite brief. We hope we have clarified the ambiguity about this feature in this article.


0 comentarios: