Running Plastic server on Linux
Linux has been a primary goal for us since the beginning of the project. We're still trying to put our GUI into the mainline (thanks to the mono folks), but the server has been up and running for months.In fact many companies seem to be very interested on running Linux servers and Windows based clients for development. And this is exactly the scenario I'll be describing here.
Plastic 1.5 (BL063 for us) introduced several improvements in the Linux installer to make it easier to set up and configure. Now you don't need to install a separate DB backend or the mono platform, they are both included by default.

I've used a blank OpenSuse box (well, actually the vmware image at www.go-mono.org) and the process shouldn't take longer than 5 minutes, unless your hard drive is pretty sloooow.

The first step will be [obvious-comment]downloading the Linux installer package[/obvious-comment] which you can find here. The name will vary from version to version but currently it is PlasticSCM-professional-1.5.63.2-linux-installer.bin.
Once you have it on your machine adjust permissions to make it executable.

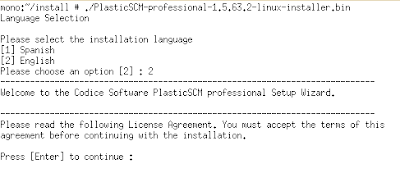
The installer is created with Bitrock InstallBuilder so it can perform both a command line mode and graphical mode installation. I don't want to have any sysadmin shouting at me so I'll follow the text based one...

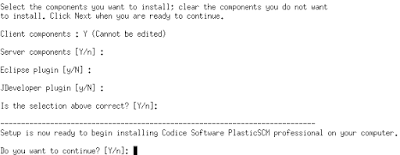
So, just execute the bin file and it will start asking questions: choose the language, specify a directory, accept the license, choose the components you need to install (we're installing a server so just server components and the command line client will be enough) and then it will start copying the files. Optionally you can also install both the Eclipse and JDeveloper plugins (and if you're running on Windows the Visual Studio plugin too).


Once the files are copied (by default into /opt/PlasticSCM) you can set up both the server and the command line client, which will help us checking whether the system is up and running.

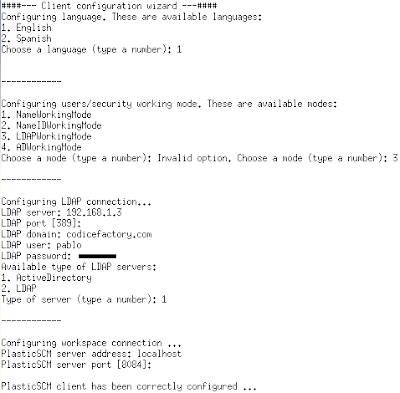
The first question will be choosing the language, and then it will jump to configuring the security working mode, which means the kind of authentication your server will work. This is a pretty important step because if you set it up wrongly your clients won't be able to connect to the server, and you will have to fix it...
So, take a look at the available options (check the image):

- Name working mode: the server will load the user list from the machine it is running on. If the clients connecting to it are running on accounts with the same name, the server will recognize them as authenticated users. As you can see it is a very easy to set up method but it will depend on how strong your network is. Identity hijacking is extremely simple if you're not a very careful sysadmin. On the other hand, it is quite useful when you just want to evaluate Plastic or need easy interoperation between Windows and Linux systems. Just make sure your user name is known to the server and you're done.
- NameID working mode: same as the previous one but matching is done using both Name and ID. On Windows systems ID is the user's SID. On Unix systems the user id. It is a bit stronger than the previous one on Windows systems but also weak in Linux groups unless you carefully control what can be attached to the network. It is ok for NIS based authentication.
- LDAP working mode: so, you have a LDAP server on your network? Well, it will be extremely easy to use for a mixed Windows/Linux scenario. You'll have to give credentials to connect to the server and be able to validate users and names. The internal ID is used for authentication. The server will need a user/passwd combination to be able to retrieve the user and ID list. This mode can also be used to connect Linux/Unix systems to Active Directory servers.
- AD working mode. AD stands for Active Directory. If you're running in AD mode on a Windows server you don't need to set up users or passwords, the server will be able to retrieve the known ones automatically. AD mode is compatible with LDAP mode: you can set up your Linux server in LDAP mode and your clients in AD, for instance.

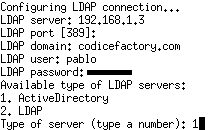
In the sample (see the image) I'm connecting to our internal server at 192.168.1.3, the domain name is codicefactory.com, and the server will use my own user to authenticate.
Then you'll have to tell whether your server is an Active Directory or an standard LDAP server.
You can also choose the TCP port in which your Plastic server will be listening.
Once all of this is set the server will start up.
Next step will be configuring the client. Ok, we said we'd be using the Linux just as a server, but it is normally a good idea to set up the command line client so we can check the server is correctly running.
The image shows you the client configuration steps.

Now we can type a command to check if the server is running. We'll use cm lwk to list the available workspaces... and because none has been created an empty list is returned.

Ok, so now you should install a Plastic client on your Windows box and set it up to connect to your Linux server. You'll have to select the language, and then the authentication mechanism. Remember to set it up accordingly to the mechanism you've set on the server. The last step will be selecting where the server is: remember to set the right IP address or name and the port. By default port 8084 is used but it can be changed during server set up.
The server is installed inside the /etc/rc directories so it will be running on system start up. To manually stop the server just run /opt/PlasticSCM/server/plasticd stop. /opt/PlasticSCM/server/plasticd start will start it up.
If you ever tried installing the new Plastic 1.5 release you've probably noticed that it takes much (*much*) longer reading how to install it than actually doing it.
Try the Linux server and let us know.


Hey!
ReplyDeleteThis is a pretty old post. Why don't you check our forum at www.plasticscm.net ??