Plastic SCM and Mantis I
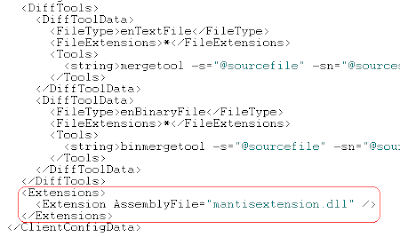
On the series of posts about Plastic SCM extension with task tracking tool, let´s see how to use Mantis extension!As on the case of other extensions, Plastic SCM extension with Mantis provides with two different working mode options: "task on branch" and "task on changeset", on this post I will talk about the first of them. To set up the extension in Plastic you must copy the ‘mantisextension.dll’’ library to the folder where you have installed Plastic SCM client and insert the following lines (circled in red) on the "client.conf" file:

You also need to create a "mantisextension.conf" file, which must have the following appearance:
<MantisExtensionConfiguration>
 <MantisBaseUrl>http://localhost:8888</MantisBaseUrl>
 <Branchprefix>SCM</Branchprefix>
 <workingmode>TaskOnBranch</workingmode>
</MantisExtensionConfiguration>
Being MantisBaseUrl the Url on which Mantis is installed.
Branchprefix is the prefix will have the created branches on PlasticSCM that you want to associate with Mantis issue. As the working mode we want to use is "task on branch", we specify it.
Once the extension is set and Mantis issues have been created we can start working!
The first step on this working mode is creating a task in Plastic, which must have the same name as the Mantis issue we want to link it to (in this case as the prefix is SCM we have to for example create branch /scm004 to link it with issue 4). Please be aware that using the "task on branch" working mode one single Mantis issue corresponds with one single Plastic SCM branch.
After the branch has been created, if you want to see the extension information you only have to go to the branch view and click on the "Show extended information option" on the top, then select the newly created branch and a menu on the right with the extension information will be displayed as the following image shows:

The extension information shows:
By clicking on it, an Explorer window with the associated branch issue will be opened, so that when the user wants to change the status of the issue or its description, he will only have to refresh it on the Plastic branch extended information and the new information will appear.


0 comentarios: